Showing posts with label green. Show all posts

Friday, May 22, 2015

Hard to Find Friday: Bliss Polish Swing into Spring

Hey all, sorry this is so late.  It's been a chaotic couple of days at work.  Hopefully I'll get some good news soon and I get a reason to celebrate.  That's all I'm going to say right now because I don't want to mess with the juju, but I'm closing my fingers.


Yay!  Bliss Polish.  Heads up guys, right off the bat, if you want either of these colors head over to Bliss Polish RIGHT NOW. The entire Swing into Spring collection is being retired and are on sale.  Get them before they're gone!


First off we have Sprout, a pastel grass green with a subtle shimmer.   The formula is smooth and even, if not a bit sheer.  I used three coats for complete opacity.  Strangely, I don't own anything in my collection this color.


I also have Kite Flying, which is my favorite one.  This color called out to me the most.  It is a very pretty blue with a gold shimmer that dries to a matte finish.  I do have top coat on in the picture.  This formula was also sheer, but smooth.  I used three coats in the picture, but if your nails are shorter you would probably be fine with just two coats.  Kite Flying is one of those polishes that even gets comments from the nail polish casuals.  This is the one I would suggest going for.  RIGHT NOW.


As the usual kind reminder, these products were purchased with my own money.  I am not cool enough to have companies send me free stuff to review them. ;)

Friday, May 8, 2015

Hard to Find Friday: Urban Decay Zodiac

Happy Friday everyone!  This week is finally over.  In case you did not already know, the beginning of the month at a bank is always hectic.  Between rent, mortgage payments, payday, social security, and credit card payments you're lucky if you get a moment to breathe.  So I am glad I finally get a couple of days off and some time to play with my nail polish.  :-)


Today I have for you Urban Decay's Zodiac.  It is a blackened green shimmer that took three coats to be completely opaque.  If you are not as picky as I am, two coats probably would have been enough, but I did find the odd patch on my nails.  I really like this color and the effect it has.  It looks almost reptilian on my nails.  I bought this polish on clearance at Nordstom Rack a few months ago, so I'm not sure if it would still be there.  If you do manage to find it, I would pick it up.  And besides, the bottle is cute.  

 As the usual kind reminder, these products were purchased with my own money.  I am not cool enough to have companies send me free stuff to review them. ;)

Friday, May 1, 2015

Hard to Find Friday: Bliss Like Totally

Happy Friday everyone.  I hope you all have some fun weekend plans.  I know my weekend is going to be super super busy.  We have a Padres game tonight, I have a polish meet up tomorrow, and then we have a cake tasting on Sunday.  This is going to be an expensive and fattening weekend.  -.-


Today I have Bliss Polish's Like Totally from her 2014 summer collection.  It is a fantastically bright, neon green holo.  Bliss Polish was hoping to bring this polish back this summer, but the pigment used for it does not mix well at all.  It is super chunky and leaves pigment clots, no matter how she mixes it.  Fortunately, her new Freestyle Summer collection that released yesterday has a neon green holo.  It is a touch lighter than Like Totally, but hopefully if you need this, that will do.  You can find her store front here.  It took three coats for complete opacity.  My middle finger does look like there is nail line, but that is actually from a gel polish mishap.

I like to wear a neutral colored gel as my base for my manis and when I get bored I just change out the polish on top.  It gives my nails and extra bit of strength and when I'm not swatching, the polish actually lasts longer on my nails.  Well recently I tried a new base coat that worked a little too well.  So well that I have patches of gel polish I can't get off my nails.  They were filed down and buffed as smooth as I could get them.  I'm just hoping that they come off over time and I don't have to wait for my nails to grow out.


As the usual kind reminder, these products were purchased with my own money.  I am not cool enough to have companies send me free stuff to review them. ;)

Wednesday, January 28, 2015

Untried Wednesday: Illamasqua Radium and Funky Fingers Glitter Explains It All

Happy Hump Day everyone!  I hope you all are having a lovely week so far.  We are a flurry of activity here at LacquerVixen Headquarters, but not for anything particularly exciting.  We've been trying to tidy up the place and had boughten one of those nifty cube organizers from Target, only to find out that it was missing all of the screws and hardware.  After having to tote it back and forth, up and down stairs, and getting a new little bag of tools from Target, we found out that the box we had boughten was a repackaged return!  Some people had already attempted to put it together, wrongly I may add, and had left screws and pegs jammed into the wrong spots.  So right now, Mr. LacquerVixen is banging away trying to force it to work because we are both exhausted with dealing with this.  Moral of the story?  Target Threshold furniture sucks.  Now let's move on to my nails, which we all know why you're really here today.


On my nails I have Illamasqua's Radium which is a bright, lime green cream with a bit of light shimmer.  There are two fantastic things that you have to know about this polish, this bright neon color was achieved alone without the help of a white base, also this is just ONE COAT.  It is a bright, fantastic color that I am very glad to have in my collection.  It is a bit brighter than Finger Paint's Mistful Thinking and Essie's More the Merrier.  It also lacks the blue flash that Sally Hansen's Chartreuse Chase.  I don't own Chartreuse Chase, but The Daily Varnish has a nice swatch.  Also, all of those polishes do end up needing three coats, while Radium only needs one to be completely opaque.  If Illamasqua is ever up on Hautelook again, this is a polish you need in your life.

My accent today is Funky Fingers Glitter Explains It All.  This polish was released in a trio of other bright glitter toppers that were all named after 90's television shows, I don't think they had a collection name, but they are fun to have.  Glitter Explains It All has white, blue, and lime green hexes along with small blue glitters.  After I had painted my nails, it occurred to me that my base was the same color lime green as some of the glitters.  Oops.  Over all the glitter pay off was very nice, and it painted on smoothly on the nail with out the need to place or dab any glitter.


As the usual kind reminder, these products were purchased with my own money.  I am not cool enough to have companies send me free stuff to review them. ;)

Saturday, December 20, 2014

Swatch Saturday: Spellbound Nails Black Leather Thigh Highs

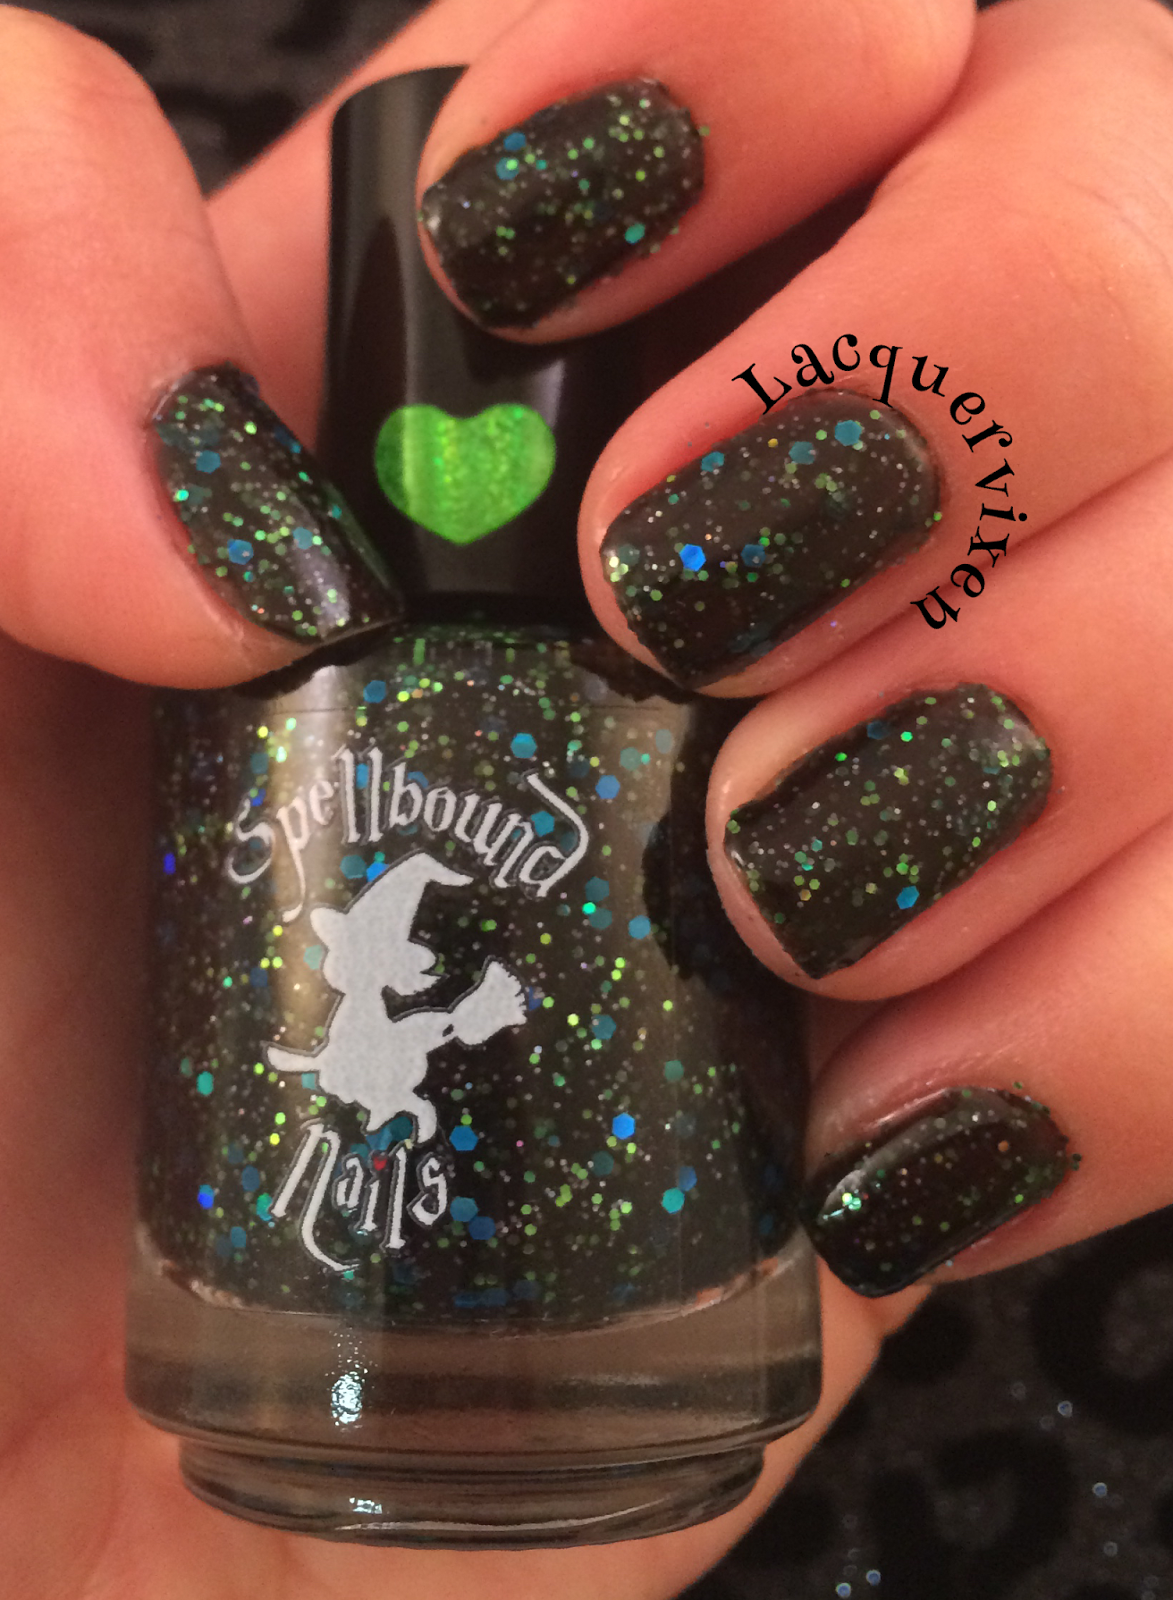
Hey all! Happy Saturday! I hope you all are having a lovely weekend. Today I have for you a polish that is technically an untried, but I wanted to show it off as quickly as possible because there is only two more bottle left in the shop, and let's not be coy here. I totally of love how sparkly this is.


This is Spellbound Nails in Black Leather Thigh Highs.  It is a black jelly with green glitters and blue hexes that give off a holographic flash.  It is so full of glitter that the formula was a touch thick and difficult to work with, especially around my cuticles and the tips of my nails, but then too much glitter is not really a thing.  This polish does have a jelly base, so it did take me three coats to reach full opacity, but that is really par for the course when it comes to jelly polishes.  I love this polish and the style actually reminds me the Deborah Lippmann glitter polishes.

If you like this polish, make sure you head over to Spellbound Nails and check it out.  You can find Black Leather Thigh Highs on there.  Like I said before, there are only two bottles left!


As the usual kind reminder. While these products were not purchased with my own money, they were a gift.  They were not sent to me for review purposes.  I am not cool enough to have people send me products for review. 

Saturday, December 6, 2014

Swatch Saturday: Picture Polish Krytonite

Yay!  It's December!  So like I've said before, ALL THE HOLIDAY COLORS!  I'm not a big fan of over the top holiday colors, I much prefer to use what I have to make a holiday themed manicure myself.  Picture Polish Kryptonite is one of those colors that looks gorgeous any time of the year, but during December it screams Christmas to me.  


It is a dark green jelly with a scattered holographic glitter.  I needed two coats to reach opacity and it is just so pretty!  When I first bought this polish, I bought it entirely because of the name.  Superman is probably my least favorite superhero and Kryptonite lets me pretend that I may be able to backhand Superman.  Yes, that is how my brain works some times.  Though, now I love this polish.  So hey, I may break my fingers if I slapped Superman, but at least my nails would be fabulous in the cast.

 Kryptonite is from Picture Polish's first Blogger Collaboration Collection from 2012.  The blogger  behind the polish is Cathy of More Nail Polish.  Picture Polish is an Australian indie brand and you can find their storefront here.  I personally prefer Llarowe for all my overseas indie needs.


As a side note, this polish was purchased with my own money.  I am not cool enough to have people send me polishes just to review them. ;-)

Monday, October 6, 2014

Mani Monday: FrankenGlitz

Happy October all!  Sure it's six days into the month, but that doesn't mean that it's still not exciting.  :-) October to me, like to so many other people, means Halloween and while I probably wouldn't have any exciting Halloween plans or wouldn't dress up, it doesn't mean that I can't start rocking all the cool Halloween manis.


First off, these are the base polishes I wore for my mani.  On my thumb, middle, and pinkie fingers I am wearing Revlon Parfumerie Lime Basil.  It is a kelly green cream that is opaque in two coats, though the formula was a touch thick, but I could probably chalk that up to owning it for almost a year and using it quite a few times.  Also it is scented!  I think that's pretty neat.  G at Nouveau Cheap described the smell of this polish the best, saying that it smells like 7 Up and effervesce.  Actually, her review of this polish last year made me run out and buy this even though I'm not really a green person.  I keep saying that I'm not a green person, but if I had to pick my top ten polishes, at least a third of them would be green.

On my index finger I have my usual one coat of Cult Nails Fetish.  I didn't top coat any of these polishes for this picture, so you can see the waxy finish that Fetish dries to.  On my ring finger I painted three coats of OPI's My Boyfriend Scales Walls.  The formula is a little bit finicky, sometimes it is opaque in two coats and sometimes it takes three.  The only reason I put up with the formula is that it is not a true pure white.  It has a touch of gray going on and I like that.


What do you guys think of my final product?  It's a simplistic version of Frankenstein and his Bride, but I like it.

On my index finger, I topped Fetish with KB Shimmer's Jack which is a black jelly with orange hexes in various sizes and a few black hexes scattered in there.  It had been released last year as Limited Edition and has returned this year.  So if you're interested, pick it up soon before she pulls it again!  It is the only obviously Halloween polish I own, so I like to use it a lot in October.

For my green nails, I did a few things.  First off I topped them with ORLY's Sparkling Garbage which is a green holo glitter in a green tinted base from ORLY's Summer 2013 Mash Up collection .  Once that dried, I used a small dotting tool to draw on Frank's hair with Fetish at the base of my nail and then two lines as his eyes.  On my two other nails, I used the same dotting tool to draw sets of lines to look like a wound and stitches.  Looking back, I probably used have used a thin brush for it, but I am happy with it for a first try.

On my ring finger, I began with topping MBSW with ORLY Shine On Crazy Diamond then using a large dotting tool to paint most of my nail with Fetish for the Bride's tall hair.  I then drew a wavy line with MBSW for the trademark white stripe of hair and finally dotted two large eyes with Fetish.


As the usual kind reminder, these products were purchased with my own money.  I am not cool enough to have companies send me free stuff to review them. ;)

Saturday, August 30, 2014

Swatch Saturday: Orly La Vida Loca and Fingerpaints Mistful Thinking

In case it wasn't obvious by now, I'm not the biggest neon afficionato.  If I do wear them, it's usually on my toes or under black glitter.  I love China Glaze's Glitz n' Pieces for that.  When I was trying to pick a color to swatch today I had pulled out most of my favorite dark polishes, but I couldn't seem to settle on any color.  Finally it occured to me that I had a strange itch for neons.  I chose Orly La Vida Loca and Fingerpaints Mistful Thinking.  I don't know why, but they were demanding to be used together.

Let's start off with this.  I don't believe in white bases for neons.  As Nicole from Young Wild and Polished has said, "white bases are for bitches".  I personally hate having too many layers of polish on my nails.  If I'm lucky I may only have three layers on my fingers, and that means a sticky base, a single coat of color, and top coat.  Usually I will have closer to five, since most colors aren't opaque in a single coat and I also like to use Opi's Nail Envy under everything.  So really, adding two to three coats of a white polish is unappealing to say the least.


Mistful Thinking is a neon green cream, probably lime green.  It reminds me of Essie's The More the Merrier, which I have swatched here.  For the picture, I painted three coats.  It painted on evenly and was pretty opaque at two coats, but I did a third to cover up a little bit of VNL.

La Vida Loca is a neon pink with a blue shimmer.  I am on a never ending quest for the perfect pink polish with blue shimmer that is opaque.  This is the closest I've come to it. This is three coats and it's so pretty, but as you can tell on my middle finger, there is still some visible nail line.  La Vida Loca did paint on pretty evenly.

I kept staring at my nails trying to figure out what they reminded me of.  Then it hit me.  Do they look familiar to you?


As the usual kind reminder, these products were purchased with my own money.  I am not cool enough to have companies send me free stuff to review them. ;)


Friday, June 6, 2014

Hard to Find Friday: Essie The More the Merrier

Hey guys!  Today I have for you one of the polishes from Essie's 2013 summer collection, Naughty Nautical.  This is The More the Merrier.


The More the Merrier is a bright chartreuse green cream and it took two coats for opacity in the picture. The formula was really easy to work with and dried to a semi matte finish, like most of the other Essie "neons" do.  I know that all over YouTube right now people have been going on rants about nail polish companies calling polishes "neon" when they're really not.  Young Wild and Polished said it the best.  If you have to wear a white base under a neon polish, then it's not truly neon.  The More the Merrier may not be a true sear your retinas green neon polish, and for that I am grateful.   I'm not the biggest neon person, but I do love bright polishes.  

If you run into this polish, it would be a good one to purchase.  I probably would not go out of my way to buy it.  There are already similar ones around.

Friday, May 9, 2014

Hard to Find Friday: China Glaze Cast a Spell

So I love Halloween.  Or maybe I just love dressing up.  Or maybe I love the free candy?  Whatever the reason is, I know I also love the dark, murky, burnt polishes that China Glaze comes out with in their Halloween collections.  I love them so much that I'm wearing them during the not Halloween season, like May. :-P


Today I am showing you guys Cast a Spell, which is from the 2012 Halloween collection.  It is a fantastic color, let me just tell you that right off the bat.  (Ha! Bat! Halloween! Get it??)  Cast a Spell is a blackened green polish with green and gold shimmers.  With every movement, the colors change on the nail and I cannot stop staring at it.  Also, It was a ONE COATER.  Whaaaaat?  Seriously I adore this polish and I am so glad I bought it on Amazon on a whim to complete free shipping.  If you can get your hands on this polish, do it.  The formula was a good even consistency and it is just so pretty.  

Okay, I should stop rambling.  Hope you guys are at least a little intrigued by this polish.

As a side note, this polish was purchased with my own money.  I am not cool enough to have people send me polishes just to review them. ;-)

Monday, May 5, 2014

Mani Monday- Strange Mermaid

Welcome to Mani Monday!  As I explained before, in an effort to make myself blog more I am having themed days.  So for today, I used a fancy new-to-me MoYou plate.  These things are gorgeous and so well made, if not a little intimidating.  Maybe I'll review it here for you guys, but know already that I love them.  Let's get this started!  I hope you guys enjoy my first successful attempt at stamping.  I am actually pretty proud of myself.


For my base I used OPIs Stranger Tides, which I just swatched the other day.  Before I started, I put two layers of Sally Hansen's Insta Dry Top Coat.  Apparently multiple coats of top coat before stamping helps protect your base color incase you need to take some acetone to your nail to erase an attempt.  It makes perfect sense, but it never would have occurred to me.  The plate I used was MoYou London's Fairytale Collection 06.  Isn't it just gorgeous?  I am a sucker for fantasy anything, especially mermaids!  This is what it looks like.


To stamp I used Cult Nail's Fetish, which is a one coat black cream with a waxy finish.  It is my current go to black polish.  To scrape away the excess polish I used just a basic plastic membership card (I think it was my Body Shop card) and to pick up the design I used the Konad spongey thing.  :P  On my index finger I placed the starfish in the mermaid's hair, my middle finger was her seashell bra, and my ring finger was the curl of her tail.  On my thumb and pinkie I swiped one good coat of Sea Lore Polish's Ariel (because really, how could I NOT use this polish in a mermaid themed mani?) and voila complete!  

I hope you guys enjoyed my nail art.  

As a side note, these polishes and stamping plate were purchased with my own money.  I am not cool enough to have people send me stuff just to review them. ;-)

Friday, May 2, 2014

Hard to Find Friday: OPI Stranger Tides

Hey guys!  Long time no blog.  Sorry about the disappearance, but I've been having some life issues that had been effecting me to such a large extreme that I could not find the motivation to really do ANYTHING other than work, sleep, and eat.  I had a wake up call the other day and told myself that I needed to get back into the habit of doing the things that I enjoy, if for no other reason than to cheer me up.  So in an effort to get back into blogging and finally swatch all the polishes I own, I've decided to have four themed days a week along with random stuff that don't necessarily fit on any day, but is still super important to share.  ;-)

My first new idea is "Hard to Find Friday".  What I classify as "hard to find" is limited editions or discontinued polishes that are no longer in most stores or indie polishes that you cannot directly get from the maker's storefront.  It's still possible to find them, it'll just take some digging in smaller beauty shops, randomly in CVS, or spending a bit more money for them online.  Ebay, Amazon, and Storenvy are good places to look.

So the other day one of my fellow polish junkies asked if I knew any place that sold Morgan Taylor polishes.  The place I managed to find not only had a pretty impressive stock, but also had a fair amount of OPIs from older collections.  I found a couple of polishes from the 2010 Katy Perry collection, the 2012 James Bond collection, and one from the 2011 Pirates of the Caribbean: On Stranger Tides collection.  Of course when I saw Stranger Tides, I had to suppress my squealing.


Stranger Tides is a murky, dusty, pale green cream.  I adore this kind of color and I love it for Spring more than most pastels.  It's not girly, but still looks pretty.  At least it does in my opinion.  

Now to the downside.  This polish a bit finicky.  This was three coats and was kind of gloopy.  The only reason it looks so smooth is my two coats of top coat.  (If you want to find out WHY I used two coats of top coat, come back Monday to find out!)  According to all the reviews I've seen from 2011, no one else really had this issue.  I suspect that the formula was difficult because it is three years old by now.  A couple of drops of thinner though and it should be perfect!  This polish makes me want to visit my local CVS and see if they still have the bottle of Planks a Lot that I had been eyeballing, even though I have two purples that are already pretty close of a color to it.  

As a side note, this polish was purchased with my own money.  I am not cool enough to have people send me polishes just to review them. ;-)

Wednesday, May 1, 2013

Dollish Polish Swatches- Welcome to Rapture and Zombie Flesh

Hey look at me, I'm almost done playing catch up on my photos!  After this, I should only have one more and it's a pretty neat one.  :-)

As I've mentioned before, one of my favorite things about nail polish is the names that people come up with for the colors.  When I first got into nail polish, I found out about Dollish Polish and her famous shade of Zombie Flesh.  

Now there were all sorts of reasons why I needed this color, I don't really have that many green polishes for one thing.  I also love the layered of the look of the cream/jelly polishes with glitter, like Hard Candy's Candy Sprinkles or Illamasqua's Speckled polishes.  But finally, the main reason I needed this polish was it's fantastic name of Zombie Flesh.  It sounds gross, so I needed it.  


Zombie Flesh is a puke green creally with dark green glitter in various sizes.  The picture shows three coats of polish.  Part of the reason I love these kind of polishes is that the sheerness allows you to see the lower layers of glitter.  It gives your nails are whole different look than if it was just a straight cream polish.  

The other nail polish I bought from Dollish Polish was called Welcome to Rapture.  When I first saw the name, I squeaked like the nerdy little fangirl I am.  Nail polish with a reference to the boytoy's favorite video game?  Yes please!  I am a super supportive girlfriend. ;-)


Welcome to Rapture is chock full of different colored glitter.  The inspiration behind it is supposed to be that moment in Bioshock when you first see Rapture from the bathosphere, specifically all the different colors and lights you see.  I really like the way the glitter looks over basic polish.  For my picture I alternated between Sally Hansen's Calypso Blue and Zoya's Jacqueline. I really like the way it looks over different colors and how heavy the glitter is.  It is dense and disperses pretty evenly over the nail.  In my opinion, it is a good multicolored glitter to have on hand.  To bad Dollish Polish is discontinuing it.  :-(

Thursday, March 14, 2013

Pinata Snow Mani

Today is only a quick mani guys.  I pulled out the polishes with the intention of just something simple for an interview and I swiped on three coats of Sally Hansen's Complete Salon Manicure in Ivory Skull.  Like I mentioned before in the Colorful Leopard Mani, this white isn't my favorite because it takes so many coats to give full coverage, but I haven't gotten around to replace it because I've been lazy.

I was going to stick with just plain white, but then I wasn't paying attention and my bottle of Ulta's Pinata-Yada jumped into my hand and demanded I use it.  This is probably my favorite glitter polish ever, probably because it has a ton of different colors in it.  It has red, fuchsia, blue, green, silver and gold glitters in various sizes.  


Tuesday, February 12, 2013

Hex Lizard Mani

In case I have not already mentioned it before, I am a nerd.  I play video games, I watch nerdy shows, I read comic books, and I love the Avengers.
OPI's Amazing Spiderman line caused my love of nail polish, more specifically Just Spotted the Lizard did. It is definitely one of my favorite polishes.


The color changes from green to gold based on the angle that light hits it. I did two coats of polish and look how pretty it is! I've noticed with metallic duochrome polishes you have to do two coats. The first coat is always way too sheer and kind of ugly. The second coat is what makes it pretty. People always comment about how it looks like beetles.


I added very light green hex glitters on my thumb, middle, and ring fingers. They added a nice reflective quality to my mani that I kept getting distracted by. Now if I only had the patience to lay down the glitters in order so they completely covered my nail, I would be golden.


Tuesday, February 5, 2013

Deborah Lipmann Mermaid's Dream

So I have a Bachelor's in Creative Writing specializing in Fiction and my writing tends to stick to fantasy for the most part.  Like any proper girly girl, I love unicorns, mermaids, fairies, and all sorts of fantastic creatures.  Hence, why when I see nail polish with "mermaid" in the name I have to have it.


Mermaid's Dream is my first Deborah Lipmann.  I spent far too long comparing the different colors I wanted until I finally decided on this one.  After all of my blues and mermaid colors, this one is still different from them all, which makes me glad I invested the $18 on it.
In real life, it is actually a touch more mint green and little less teal.  Mermaid's Dream is a thick glitter with specks of holo glitter that I did not actually notice until I was in the sunlight.  The holo was a nice little sparkly surprise.  There are also navy blue glitters running through it.  I layered one coat of Mermaid's Dream over Sinful Colors' Mint Apple, partially because both were perfect matches for each other, and partially because I did not want to have to attempt to remove three coats of solid glitter.
The last thing that I love about this polish is how forgiving this formula is.  It completely filled in the still healing ridges I have left from my six month stint with acrylics.

Saturday, January 26, 2013

Julep Cindy Swatch

When I first started getting in nail polish, I spent a whole bunch of time reading blogs, and on Pinterest.  I kept hearing about Julep, and their Maven program.  Come on, $20 a month for at two to three nail polishes that are trendy and chosen to best fit your style?  It's a steal!  Especially considering that they're fabulous colors and good quality.

At some point I got Cindy, I don't remember if it came in a box or as an add on.  I just remember picking it because I didn't have any green polishes and it was sparkly.  For the longest time it just stayed in my nail polish case and for whatever reason I never picked it up.  Well I finally used it and it is fantastic.
Cindy is a grassy green jelly with tiny green and gold glitter, though it is a little hard to notice the gold in the picture.  I had to do three coats to get this coverage because at two I still had a little bit of a visible nail line.
I got a ton of compliments on this color.  My favorite was "I like your nails because they're my favorite color.  Green, like money."